


")
Price: $569.98 - $360.23
(as of May 25, 2025 16:58:08 UTC – Details)
Product Overview
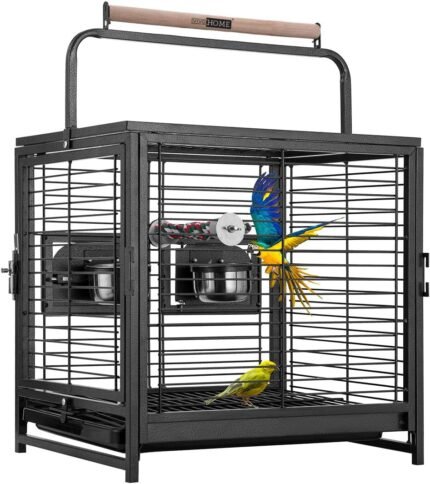
The High Impact Resistant Polycarbonate Bird Carrier is a durable and well-ventilated enclosure designed for safe and comfortable transportation of birds. Made with high-quality materials, including polycarbonate and stainless steel, this carrier ensures even airflow and complete ventilation, making it an ideal choice for bird owners.
Features
- High impact resistant polycarbonate construction
- Stainless steel door with 5/8" bar spacing
- Adjustable textured perch with 5 locations
- Adjustable shoulder strap for easy carrying
- Includes Sure Lock Cup and two perches (1 3/4" and 1.5" dia)
- Easy to set up
- Dimensions: 17.5" (H) x 15" (W) x 30.25" (L) with a body height of 14.6"
- Weight: 13.35lbs
Pros
- Durable and resistant to impacts, ensuring the bird’s safety
- Excellent ventilation for the bird’s comfort
- Adjustable perch and shoulder strap for customized comfort and ease of use
- Includes necessary accessories like the Sure Lock Cup and perches
- Easy to assemble and disassemble for travel or storage
Cons
- May be heavier than other carriers due to the high-quality materials used
- The size may not be suitable for very small birds or for carrying multiple birds at once
Product Details
- Discontinued By Manufacturer: No
- Package Dimensions: 30.75 x 18 x 7.3 inches; 17.95 Pounds
- Date First Available: October 14, 2015
- Manufacturer: Caitec Corp
- ASIN: B016TR0RPU


Tigerlily –
Worth the huge hassle of assembly
Putting this thing together was an exercise in frustration and brief fits of rage. However, I love the carrier, and my macaw is willing to go into it. Iâm a not-particularly-tall female, and this carrier is reasonably easy for me to get around with. If a pack of wild zebra stampeded through my home and destroyed it, I would order another on the spot. That said, Iâd likely cry a bit over the need to assemble it.Please note that it can become quite warm very quickly inside this type of carrier; if you have a bird in a carrier like this please please please do NOT leave it in direct sunlight.
Brenda –
Just be patient with assembly and call manufacturer if you have questions.
I did have a problem in that the perch was too short to fit (it would fall down and not support the weight of the bird, it likely had been an anomaly in production line and I certainly don’t think that all of these plastic carriers have this problem) But great service in that the seller arranged for manufacturer to contact me right away which the manufacturer did and they did send me another perch that fit perfectly and it came pronto which was excellent—-BUT the manufacturer may need to make their product a bit easier to assemble as, it takes some patience. The biggest takeaway for assembly is/are FIRST– remember to line up the perch holes on BOTH sides when you assemble to align the perch holes with BOTTOM orientation of the cage, otherwise you will either have an extremely sloped perch setup (one side panel with perch holes on top and one side panel with perch holes on bottom- which ultimately if assemble with one perch hole up and one down then you would find it will not work as the perch needs to fit straight in the holes and not at an angle because perch at an angle will not work and you will have to un-assemble and re-assemble and you don’t want to do that) or the other mistake you can make with the side panel perch holes is that you will have both of the perch holes aligned/positioned at the top of the cage (NO NO !!) which may be okay if you have a pet bat (to hang from the perch- besides, I am pretty sure bats are illegal to keep as pets but I digress 😉 but this will not work if you mistakenly assemble with a high perch orientation leaving only one option (for a bird to hang upside down which we know is moot because you donât want your bird upside down of course, but I am just trying to make a noticeable/glaring point so you donât make this mistake) because if you have a pet bird of reasonable size that this carrier was designed for (medium and larger birds) there will not be enough room n perch area if you mistakenly position the perch holes towards the top of carrier or other mistake with perch will is that it will not fit in the holes if you misalign them (one perch hole up and one down from improper side panel assembly). Cardinal rules of assembly: PATIENCE; plastic is kind of thin but this is probably for design as cage has curved design which make require a thinner /more ‘flex” type plastic, but at any rate be careful with plastic and assembling it, contact customer service if you need help (they were excellent with me) use only hands (no tools/mallets, etc as plastic will break) to assemble on SOFT/CARPETED/TOWELED/BLANKETED flooring; use even pressure and palm of hands as you slide side panels towards end door panel (which should be on the soft/carpeted/toweled floor/BOTTOM as you assemble per instructions). Further tips: use nondominant hand to gently and evenly push from the top edge of panel so not form an angle with the edge of panel as you push panel down just keep it descending straight and even toward the bottom panel/end door panel, while using dominant hand and palm of dominant hand to help guide panel but note that when you get the side (or bottom panel , i.e., whichever panel you are working with) nearing to the bottom it gets a little thorny but just keep trying to use your nondominant hand to guide panel EVENLY-keep straight/no angles and even pressure as you slide the panel(s) to the bottom and very helpful is to use the soft PADS of your fingers/thumb on your dominant hand to evenly and gently push and manipulate the connections â especially the corner connections– from the two pieces together –as you approach the bottom with the panel sliding it down into those trickier/”thorny” corner connectors so they snap into place. (Please note that after the side panels you have to do the same with the bottom panel and slide it down evenly and the bottom panel took the most work for me getting it to snap into place.) Just remember the even pressure and slide it evenly down, use the pads of fingers and thumbs to get it to align and snap into place and for me this took a few repeats with the bottom panel as the bottom panel was a bit more finicky than the side panels, again, keep the panel even going down and can guide with palm of nondominant hand as dominant hand pushes it evenly down, (not at angle) and use soft pads of fingers/thumbs for trickier corners. Gently keep pushing it until you hear the snaps. After you get the bottom panel properly attached, then put other end door panel on (as you have carrier upright like a tower configuration)- PLEASE NOTE that with door panels and it is VERY important that the door panel locks into place with side panel properly. Gently and repeatedly use the heel of both of your hands and simultaneously apply pressure with the heel of both of your hands all around the edges/perimeter of the end door panels as they attach to side panels Do this gentle even heel pressure with all of the gentle force you can muster as long as it is even and gentle pressure on carpet/soft flooring and keep repeating this pressure on edges MULTIPLE times and listen for the very obvious snap (and perhaps even somewhat jarring snap noise) that indicates the end panel has connected to the side panel. If the snap is not an obvious SNAP then VERY likely the end panel will not be properly attached (BAD !). Visually inspect the connections that the plastic connectors from door to side panels are locked together and once you feel certain they are connected then invert the carrier so you can work on the opposite door (which was on the floor/bottom as you assembled) and repeat the process (heel of hand pressure around the edges repeatedly to get it to very obviously SNAP into place) and do visual inspection of those connectors as well. IN fact, each and EVERY time before I use this to carry my bird I will still do a “SNAP” check to be sure each end (door) connections are well snapped into place , repeating using the heel pressure technique along the edges and visually inspecting BOTH ends and âsnap-checkingâ both ends I described above to be extra careful). Good luck and again, check with manufacturer if you have questions.
Amazon Customer –
Excellent design
Very nice design and tough. Took a little strength to slide pieces toghether.i would highly reccommend this carrier.It is the best design I have yet to find.
S. Batz –
Plastic is thin be careful during assembly. Do not force any part
The assembly must be done with great care. The plastic is thin about an 1/8 inch thick feels easy to break .I did NOT break it….. plastic feels brittle like it could snap very easy. Assembly instructions are of little value. The side pieces be sure to place so the perch holes are both to the bottom of the cage. I assembled the first time with the sides with perch holes one on top other to bottom. Door latches are not of very good quality difficult to slide into lock position. I need to try with my Blue and Gold Macaw to check it for durability.Plan to keep this together after assembly forever. The plastic I believe will break before the locking tabs come apart.
Amazon Customer –
Great for macaw
Hard to put together bc itâs very delicate. But worth it
Akademe Foundation –
Difficult to assemble
And breaks instead. Looks and is wonderful when it works. Used one which encouraged us to ask for one. Would love to exchange. A donor sent this off our wish list. It has not agreed with being assembled. We thought it was. I was recently organizing our carriers and saw it was coming apart. Itâs literally been unused sitting on top of everything. So I fight it back together and it cracks! IMO it would be better with small screws than those tabs. Please advise how we can exchange since we received this as a donation. Thx
Kerry Burnside –
Big Bird big carrier equals perfect
Finally a carrier that can fit in my car with my large bird
Shane S Christley –
Perfect for macaws
Great travel container for my Macaw. She loves to be able to see out when sheâs inside the carrier. Be very careful when you put it together. The connector pieces on the end of the sides of the carrier break extremely easily. One of mine snapped coming out of the box. The carrier comes with zero assembly instructions and I put it together upside down the first time and had to carefully take it apart.